Godaddy Domain and Sub-Domain integration with AWS Route 53

Launch 1 ec2 instance with Public IP.

Adding Domain
Create a hosted zone for Domain i.e. easytechcode.com

And you will see by default, 2 types of routing policies will automatically create.
Now, we have to make a record of Type A with Simple Routing attaching the ec2 instance Public IP i.e 13.232.145.51 for our domain easytechcode.com.

Now, you will see your record name at last.

Adding Sub-Domain
Create Hosted Zone for Sub-domain i.e. blog.easytechcode.com

Do same steps as you done for Domain.

Coming to Godaddy Account

Configuring Godaddy DNS
Go to the DNS Management https://dcc.godaddy.com/manage/yourdomain.com
If you use the Godaddy Nameserver then you can add new record for the Domain or Subdomain.
Example
Adding record of the domain as a @ (it domain) and the Public IP of ec2 instance as a Value.

OR
Change the Nameserver.

Add your Nameserver of AWS Route 53 in Godaddy.
I added Nameserver for Domain as well as for Sub-Domain.

After doing this setup you might not see any changes from your browser because the browser stores caches.
For faster confirmation of the setup is working or not use this approach.
You can log in to your ec2 instance and from there use the curl program to access this Domain or Subdomain URL.
ssh -l ec2-user 13.232.145.51 -i aws-key.pem
OR
Try with one of the AWS Route53 DNS.
nslookup www.easytechcode.com ns-1272.awsdns-31.org.
Try with one of the Godaddy DNS.
nslookup www.easytechcode.com ns68.domaincontrol.com
Do the same for the Sub-Domain also.
It takes some hours to update DNS and you will be notified by Godaddy via email.
Note
It takes 6–7 hours to update the nameserver in Godaddy.

Sub-domain Output
nslookup command shows your DNS and the attached IP.

nslookup www.blogs.easytechcode.com
Domain Output
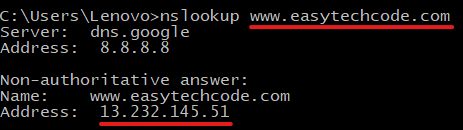
nslookup www.easytechcode.com